Showing posts with label MME. Show all posts

Wednesday, July 9, 2014

Clean and Simple - Pink and Lime

Hey Scrappers!

Today I'd like to share with you a quick blog post. I created a clean and simple layout in white, pink and lime. I was inspired by a layout I found on Pinterest and wanted to try this color combo. And this is what I came up with:


All the paper scraps, washi tapes and stickers are from the MME Up & Away collection. I created the little heart-pin by myself with a punch and some glitter. 


A few spritzers lime, a few sprinkles in pink and some matte gel on the background - that's pretty much it! Thank's for stopping by! 

Monday, November 18, 2013

☆ Arabian Nights ☆

Hey Scrappers,

I hope you had a great start into your week :) Today I wanted to get along with a color and a sketch challenge. The color challenge is from ScrapFriends and the sketch challenge from Stuck?!Sketches, and that's my take on these two challenges: 


The color scheme from Scrapfriends (black, dark grey-blue, light grey, curry, light grey-blue) is really cool and I've never used these colors on a layout before. I took two pictures, which were taken in Egypt on market at night. We drank some black tea and enjoyed an arabian show. What a great night! All these bright colors and lights were really stunning and beautiful. Since the colors of the pictures match perfect with the color scheme of Scrapfriends, I used them for this layout.  


For the title I used some acrylic letters from Maya Road and sponged them a little bit with InkaGold (some gold wax from Viva Decor).


I used the new "moon and stars" Bigz die from Sizzix to cut out these tiny stars in different sizes and covered them with some "mustard seed" Distress stickles. 


The chipboard banner piece is an embellishment from MME; I just put some twine through it an made a bow.


For the background I used again a stencil and some molding paste, which I mixed with some acrylic paint to give it this dark yellow look. After that, I stitched a huge circle with some darker yellow sew-easy floss. 


The stars below were from the Sizzix cutting die, too; I just painted some dots with Liquid Pearls on them.


For the background I used a StudioCalico paper from the Aboard series; for the layering I used patterned paper from the MME series "find your wings and fly". 

Thank you so much for stopping by, and have a wonderful week! 
I hope you enjoyed my work :) 

Thursday, October 31, 2013

Altered craft caddy from Kaisercraft

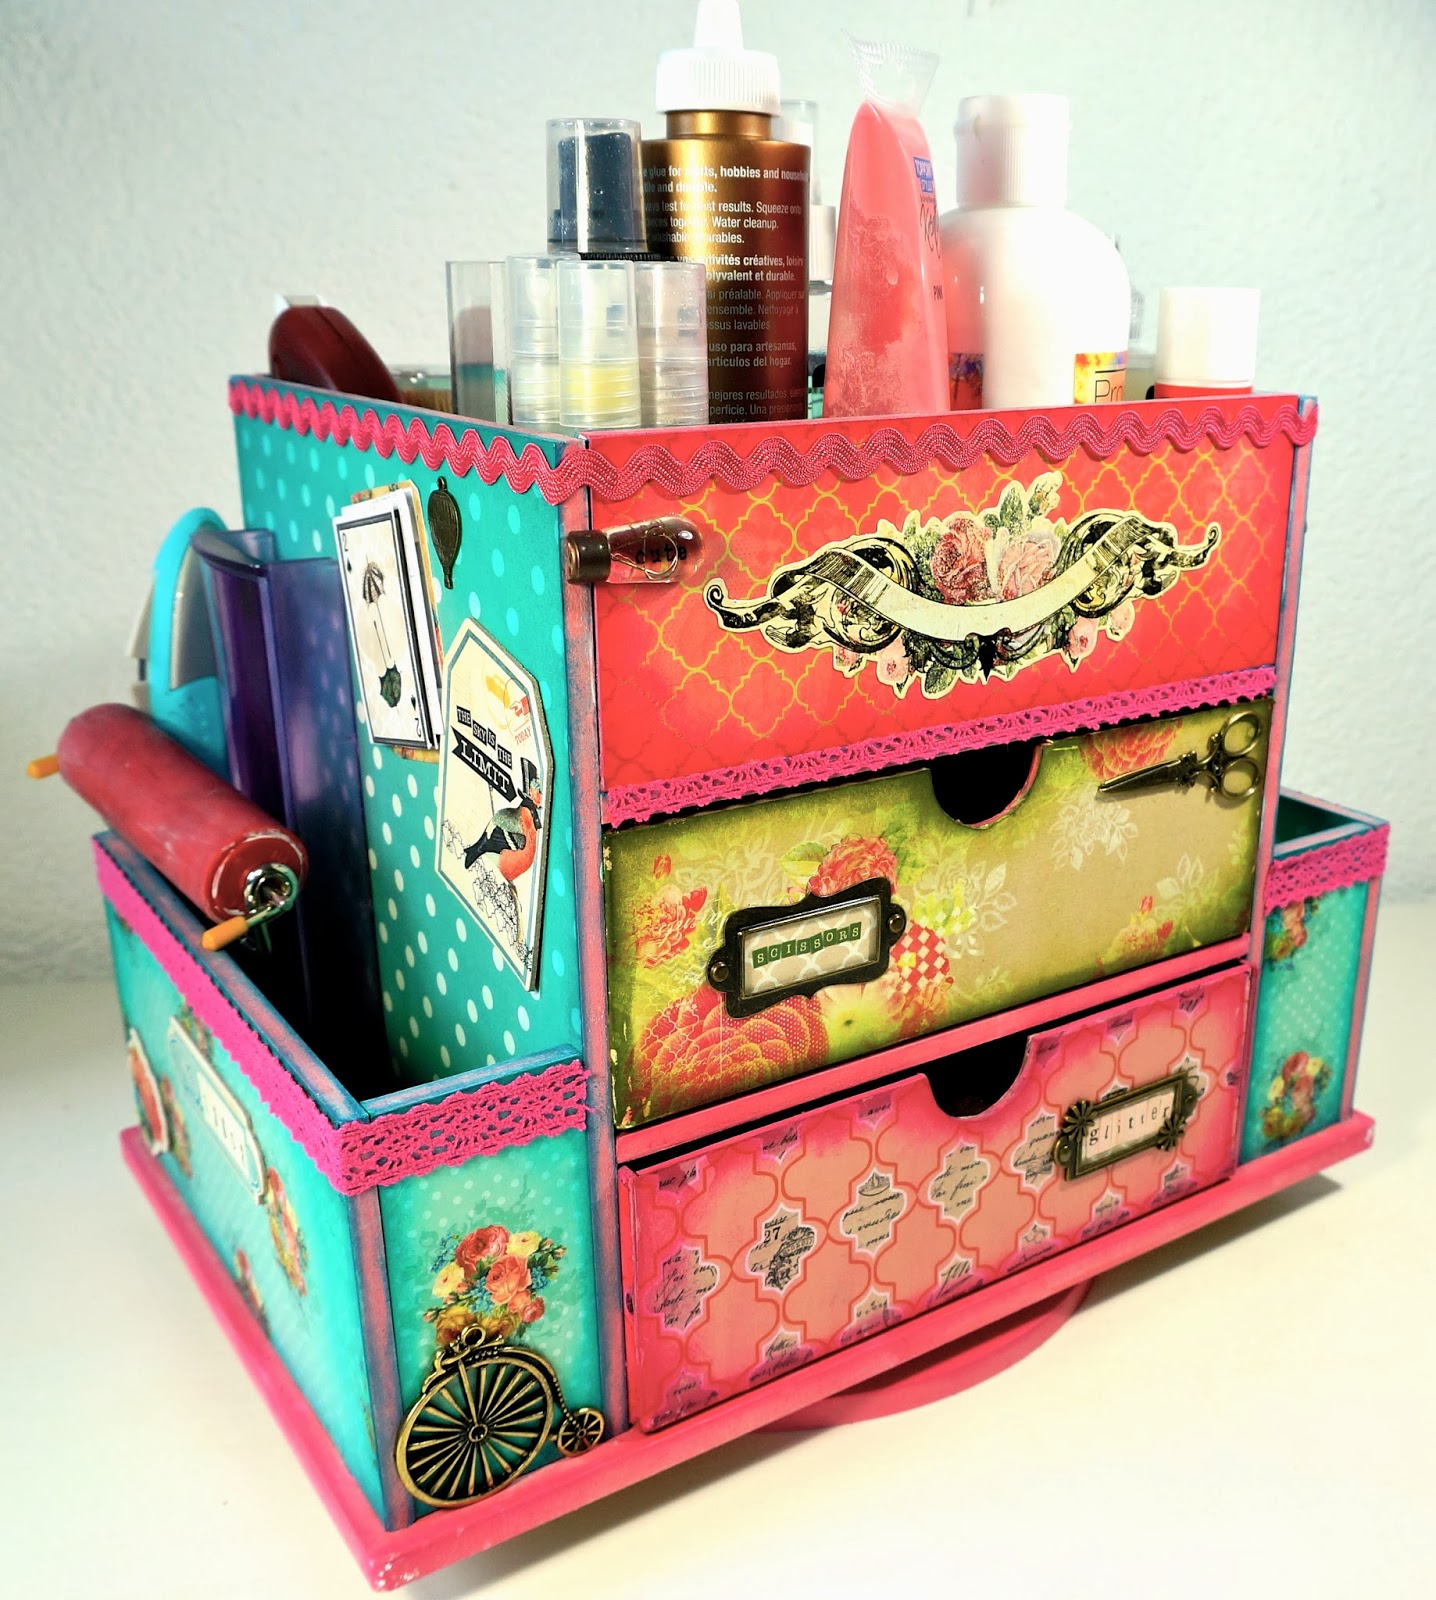
As I mentioned, I love altering and altered stuff.  The Kaisercraft - beyond the page products are great for this purpose, so I get myself a Craft Caddy for a better organizing of my workspace. 

So finally I took out my camera and did some shots of my Craft Caddy from Kaisercraft. First I primed all the edges of the single wood pieces with withe gesso, after that I covered it twice with a rather light pink acrylic color, so it had an even appearance. After that I chose some patterned paper for the project. I decided to use the "find your wings and fly - sky's the limit and up&away " series from My Mind's Eye. This series has really bold and bright shades of pink, teal, and green. I absolutely love these series for having all these fun and fantastic images. 

I covered all the areas with the 12x12 papers and inked the edges with matching distress ink. I even covered all the inside areas from the drawers with paper! This took me quiet a lot of time to cut all the paper in the right size, but it was definitely worth it. At the end, I embellished the Craft Caddy with some metal embellishment, lace- and zig-zag-ribbon, some matching chipboard stickers and layered stickers from the MME series. 


Kaisercraft CraftCaddy front
Kaisercraft CraftCaddy back

CraftCaddy right side

CraftCaddy left side

close-up of the drawers
Every drawer has its own label with just the right thing in it. On the front I keep my favorite inks (label: ink pads) and some of my tools as sponges, craft knife, distressing tool and needles... (label: tools). On the back side I keep my patterned scissors (label: scissors) and my dry glitters (label: glitter). On the upper part of the Craft Caddy I store all my bottles, like different glues, glossy accents, crackle paint and my mini water misters. At the sides I put my Crop-a-dile, my acrylic blocks and some glue dots.

inside of the drawer

I really love how that turned out, and I keep it directly in the middle of my crafting space, so I have everything next to me when I'm crafting. Hope you enjoy! :)